• Skip to primary navigation
  • Skip to main content

Quilter's Thread

Quilting Inspiration and Education

  • Home
  • About Lisa
  • Gallery
  • Shop
    • Cart
    • QT Summits
    • Patterns
  • Events
    • Calendar
  • Contact

QT User Blog

Connecting the Threads, Where Do You Start?

April 28, 2015 By Quilter's Thread

Just like any other project or task there’s a beginning, a middle and an end. It takes a lot of time and preparation to begin and finish a quilt. When beginning a quilt, you must take the time to explore the many options on how you are going to go about making your quilt right down to the very fist stitch.

So where do you begin? It’s the easiest and hardest part of the process but once you get started you are on the path to making progress. However, there are different ways people can go about starting a quilt. Let’s explore the different options of where to begin when making a quilt.

1.) Start with a color

One way to start your quilt project is by first deciding what colors to incorporate in the quilt. Choosing your color scheme first will have an affect on what kind of style and or pattern of quilt you will want. If you prefer picking your colors as your first step to starting your quilt, a great way to choose colors is using a color wheel to help you match colors together. Also it’s important to remember that warmer colors for instance red, yellow and oranges appear closer together while cooler colors such as blues and greens will appear as farther away which can have an affect on the overall appearance of your quilt.

2.) Start with a fabric

Starting with fabric is also another way to begin your project. It’s important to have an idea of what kind of fabric you want to use especially if the quilt will be used for a bed cover. The type of fabric you choose may depend on the current weather as well such as choosing lighter fabric for the summer and heavier fabric for the winter.

Another tip when picking out fabric for your quilt is to always buy a little more than you need. This saves you extra time from not having to run back to the store to get extra material if it turns out you needed more than expected. If you don’t use the extra fabric you can save it for future projects and or make a rag quilt out of all of your leftover scraps of fabric.

3.) Start with a pattern

Picking out your pattern is also another great way to start your quilt if you prefer knowing how your quilt is going to be laid out first before deciding anything else. There are limitless patterns to choose from, some more simple and others more intricate. Don’t get too flustered by the large amount of options of patterns to pick from, simply spend a good 10 to 15 minutes looking and then decide on a pattern that pleases you and you won’t find yourself dwelling on it too much.


4.) Plan around the person or purpose the quilt is for

Most often when quilter’s start a quilt we normally have an idea of whom the quilt is for or where it will be place in the household. Some times this is how people actually begin their quilt project by deciding the purpose for the quilt and taking their next steps from there.


So how do you begin your quilts? Do you first start by picking out the color, pattern or fabric? Share with us how you start a quilt on our mobile app.

Live Well. Quilt Well.
 

Choosing the Right Thread for Your Quilt

April 21, 2015 By Quilter's Thread

There are so many things that go into making a quilt. There’s the fabric, the pattern, the batting, and all the other necessary tools needed to create a quilt.

However, one of the most important parts of the quilt is the thread. The thread is what  holds everything together and in place. Picking the right thread for your quilt may not seem important when picking it out at first but later down the road when your thread is coming undone, it will. This is why it is important to understand what kind of threads are available and what kind of thread you will need when starting your next quilt project.

Before picking out your thread, first determine what kind of quilt project you are going to start. Are you going to choose to make a quilt by hand? Or will it be by machine? Depending on the answer to this question you can determine what thread you will need in order to get the perfect stitches for your quilt.

So which thread should you use? Here is a list of the various kinds of threads that you can choose from.

100 % Cotton

The best kind of thread to use when quilting is one that is 100% cotton. This is because 100% cotton thread is much more stronger and smoother than any other kind of threads. Plus the thread produces less lint than other lower quality cotton threads, giving you a cleaner stitch.

Aurifil Mako 50 weight cotton thread

This thread has a silky smooth touch and is well known for its high durability. The higher thread weight allows the thread to be thinner and will help enhance your fabric design.

40 weight cotton thread

40 weight cotton thread is best used when using a sewing machine to make a quilt. It’s lighter than the 50 weight cotton thread and it won’t show up as easily on the quilt when making your stitches. Make sure to adjust the settings on the sewing machine as needed if you don’t normally use lighter threads.

28 weight cotton thread

28 weight cotton thread is a good choice when choosing to quilt by hand. The thread is heavy, making the thread able to withstand all the pulling and stretching you will be doing when stitching the quilt together by hand.

Quilting by hand can over time make your finger tips hurt due to putting more pressure on the needle due to the heavier thread. This can make it more difficult for you to pull the thread through by hand. As a solution some quilters suggest using a form of wax on the thread in order to help the thread slide easily through the fabrics and batting of the quilt. One product that helps in particular when threading is Thread Heaven. Thread Heaven is a product that comes in a box containing a conditioner like wax in which you use to spread over your thread making it easier to sew through any kind of fabric.

Polyester thread:

Polyester is also another type of thread that you can choose to use when quilting. Polyester thread is durable and strong allowing the thread to sink further down into the fabric more than regular cotton thread.

Nylon thread:

Nylon is a very fine thread and works very well for applique as well as if you are using the sewing machine. However be cautious when ironing your quilt if you use this kind of thread because of its low resistance to heat. If over heated the thread becomes more brittle and may break off.

Silk thread:

Silk thread is another option to use when quilting. 100 weight silk thread works well for applique as well and will make your stitches nearly invisible to the eye.

Tip: type of color

When picking out your thread keep in mind what shade it is. If the quilt consists of nude shades then pick a similar nude shade for thread such as grey or cream in order to match the quilt. Also make sure you match your color of the binding thread to the binding fabric as well.

Share with us on our mobile app what type of thread you use for your quilt projects and why.

Live Well. Quilt Well.

Create the Perfect Oversized Ironing Table

April 14, 2015 By Quilter's Thread

Looking for a way to reorganize and make your working space more compatible for your quilting projects? Turn a regular wooden table that you have laying around into an over-sized ironing board perfect for any project size. By having a larger ironing board it will allow you to have extra room to lay things out properly and iron large pieces of fabrics.

Benefits of the table:

  • Designed to your preference
  • Bigger space for crafting
  • Sturdier place to iron and work on projects
  • Can decorate table as you please

What you’ll need:

  • Wooden table (any size you want)
  • Two to three layers of 100% cotton batting
  • One piece of cotton decorator weight fabric
  • Cotton twill tape
  • Staple gun
  • Pin tacks
  • Fabric glue

Step 1. Pick out your table

You can either choose to use a regular dinner table about 30 inches high or a higher bar table, either is great. Simply choose whichever height and length you prefer to work with when working on projects. Once you have picked out your table make sure you properly clean the table with warm water and soap before turning it into an ironing board. Depending on the table you might want to use something besides soap and water to clean the table if there is extra dust or marks on it. You can also use a commercial deglossing liquid to make your table look brand new. Once your table is properly cleaned it is time for the next step.

Step 2. Tape off the edges (optional)

This step is only for people who wish to spray paint their table legs a different color simply for style preference. Spray paint your table outside away from any valuable objects and let it set for 20 minutes until until dry.

Step 3. Picking out the layers

Measure the top of your table to get an accurate measurement for what lengths of fabric you will need before heading to the store. Make sure you add an extra foot to your measurements for the fabrics, this will give you extra room for attaching the fabric underneath the table edges. Next you will use two layers of 100% cotton battling and one piece of cotton decorator weight fabric to create the padding for your iron table board. You will also need a staple gun to attach the cloth under the table edges.

Tip: When picking out the fabric you want make sure you choose one that isn’t going to bleed into your precious blocks of fabric when ironing. Try to avoid colors that tend to do so such as red. If there is dye in the cloth make sure that you wash it first before creating your iron table. If you need help feel free to ask an employee working, they will be able to help you pick out the material.

Step 4. Attaching the fabric to the table

Once you have your fabric cut to the proper length of the table with the extra foot of fabric to pin under the table, you want to now stack the layers of fabric on top of the table. The cotton decorator weight fabric goes on the top and the two or three layers of cotton battling goes underneath it, giving more padding to the table. Be careful when handling the batting because it can easily tear.

Once you have it on your table with the fabric distributed evenly on each side pin it down with pin tacks under the table edges. Make sure that the pin tacks can be easily removed, the purpose of doing this is to hold the fabric in place when using the staple gun. Sometimes its easier to do this by placing the table top with the fabric flat on the ground to pin it. This prevents the fabric from moving  from one side of the table to another making it uneven as well as straining your back from bending under the table. Once you have pinned the fabric to keep it in place use a staple gun to staple the fabric securely in place around the edges of the board. Leave the corners for last when stapling so that you can easily fold them over and staple them in place. To staple corners first pull them into a triangle and then fold it over twice and then staple. This is a similar method as when you wrap a present and  you need to fold the edges into a triangle and then fold again before taping it to secure the wrapping. Once all edges of the table are stapled in remove the pin tacks that were once holding the fabric in place.

Step 5. Hide the staples

To hide the staples use a cotton twill tape and glue it over the the outline of the staples for a nice polished clean look. By doing this it will also prevent things from getting hooked to the staples. If it helps put the table with the top on the ground for a better view and position in order to properly glue the cotton twill tape over the staples along the sides of the table.

Make sure to post your end result of your ironing table on our mobile app. Or share any tips and other creative ideas that you might have used when creating your ironing board table.

Live Well. Quilt Well.

Chevron Quilt Design Back in Style

March 31, 2015 By Quilter's Thread

Chevron is a pattern that has been around for many centuries now. Chevron is a simple v-shape that appears intricate with its repeated zigzag design in multiple shades of color. It was first found being used on ancient pottery work and rock carvings but throughout history it has been used in many styles of art, clothing, quilts, and other crafts.

Chevron blankets are a popular style that department stores such as Target, JC Penny and Macy’s are currently selling. When buying a chevron blanket, you take the risk of friends and family having the exact same one. So instead make you own chevron quilt. There are many different creative ways to make your chevron quilt unique and one of a kind while also having that modern look, great for any household. Pick out your favorite colors and use multiple shades of that color to make the quilt. Here are a few ideas and examples to help get you started.

Blue Chevron Quilt

One chevron style is picking a color such as blue and using multiple shades of that color in a combined zigzag pattern. You can even pick some blue shades that have designs within it such as dots and checkers, this is another great way to make your chevron quilt even more versatile.

Blue and White Chevron Quilt

If you wanted to get more colors into the quilt design, white is a great color to make blue or any other color pop out. Using  a white shade will make the blue shades more vibrant and more rich. There many other ways to make creative chevron designs and looks, such as adding on a different color to the back of the quilt to switch things up a little bit. This is great if you eventually get tired of the chevron design. By simply turning the quilt over you will have a different design or color shade quilt for the bed.

Pink Ombre Chevron Quilt

Another great style that is becoming popular is ombre. An ombre chevron quilt is one that starts with a light color shading down to its darkest shade of that color. Making an ombre chevron quilt is another way to add your own creative style to your quilt.

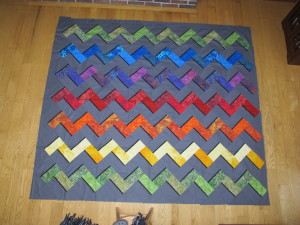
Rainbow Chevron Quilt

Another fun chevron style is a rainbow one as shown in the image below.

Zigzag (Chevron)

Design a modern top trending chevron quilt perfect for any bedroom in your home. Use  any of these chevron designs or create your own style and share it with us on our mobile app.

Live Well. Quilt. Well.

« Previous Page
Next Page »

Copyright Quilter's Thread© 2025