• Skip to primary navigation
  • Skip to main content

Quilter's Thread

Quilting Inspiration and Education

  • Home
  • About Lisa
  • Gallery
  • Shop
    • Cart
    • QT Summits
    • Patterns
  • Events
    • Calendar
  • Contact

QT User Blog

How to Pick the Right Colors

May 26, 2015 By Quilter's Thread

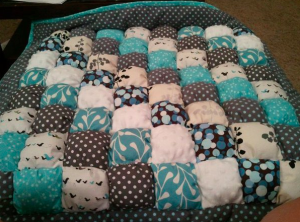
Sometimes when starting a new quilt project we can have everything all planned out perfectly. For instance, what pattern we want to use, what method and what kind of fabric. However, sometimes we can get stuck on the endless amount of colors to incorporate into our quilt. With limitless options of colors and shades to pick from it can get overwhelming when picking the perfect color scheme for your next quilt.

It’s important to pick the right colors that will go together in order to make the quilt design complete and with the colors complementing each other. If you pick colors that don’t go together well then it will not appear as pleasant once used in the quilt design. It is also important to pick colors that are catching and appealing to the eye.

Here are some great tips and suggestions of what colors go well together and what colors don’t.

The Color Wheel:

img_choose-fabriclg_ss1-300x300

A color wheel is the most helpful tool when picking out your colors for your quilt. If you find yourself spending hours deciding on colors to incorporate just turn to this helpful tool to save you some extra time. Normally all quilt and fabric stores have these handy tools in their stores to help make the process of picking out colors much easier.

The colors on the outside of the wheel are called the “pure hue” and are the most intense form of  color. As the colors go inward they become less intense with more white is added to them. The last section of colors is the closest to the center of the wheel and have more black added to them making them the least intense. The colors on the wheel compliment the colors on the other side of the wheel. For instance, in the color wheel yellow and purple are across from each other, therefore they complement each other. This is what makes the color wheel so useful when picking out your fabric colors, by helping you pick ones that complement each other.

Tip: Black is the second dullest color, gray is the first most dull color of all.

Primary Colors:

To refresh your memory the primary top fundamental colors that when combined can create a more wide range of colors.

  • Red
  • Yellow
  • Blue

 Complementary colors:

These colors are great to use together in order to create an overall great looking quilt that is appealing to the eye.

  • Purple and yellow
  • Red and green
  • Blue and orange

List of colors that also work well together:

  • Cream, lavender and gray
  • Navy blue, forest green and gray
  • Lime green, deep purple and aqua blue
  • Black, light brown and white
  • Beige brown, light blue and cream
  • Yellow, blue teal and white
  • Navy blue, baby blue and white
  • Pink, beige, yellow and white
  • Pink, berry purple, deep red and cream

And the list goes on! Share with us your favorite colors when creating a quilt on our Quilter’s Thread mobile app.

Live Well. Quilt Well.

Trending Baby Bubble Quilts

May 20, 2015 By Quilter's Thread

Looking to create a quilt that’s different and outside your ordinary design this summer? Try making a baby bubble quilt, also called a biscuit quilt due to its extra puffy blocks of fabric which give the quilt more volume and texture in appearance than a regular quilt design. These baby bubble quilts are a fun project to tackle this summer with its fun quirky appearance just like a colorful sheet of bubble wrap but without the popping!

Screen Shot 2015-05-20 at 3.28.53 PM

These baby bubble quilts are becoming such a hit in the quilting industry and are a fun way to make and are great for all age groups. These bubble style quilts are great with younger children and toddlers, giving them an extra level of padding and support to lay on at home or at the park. Bubble quilts also make great gifts for any family members or friends that gives extra comfort similar to a comforter than a normal quilt does. Determine the level of layers you want in your bubble quilt in order to make it the right level of comfort you see fit.


Tips and information about the baby bubble quilt:

  •  You can either do a regular mitered corner edging around the bubble quilt or you can get creative making a ruffle edging.
  • Making a baby bubble quilt takes extra time due to the extra steps and extra padding that needs to be added individually to each square patch.
  • Since a baby bubble quilt has more padding than a regular quilt, making one will include more math due to the necessary three layers of fabric for each square with the top layers being wider in order to add the stuffing.

Making a baby bubble quilt includes some different steps and techniques in order to create the bubble shaped squares. Further information and instructions to create a bubble quilt can be found at 24 Blocks.

Make sure to share with us your finished creations of the baby bubble quilt on our Quilter’s Thread mobile app. Users who share and comment on the app can increase their chances to win a free Quilter’s Thread gift certificate.

Live Well. Quilt Well.

Connecting the Threads, How Do You Finish?

May 15, 2015 By Quilter's Thread

Finishing a quilt can be such a rewarding feeling with a strong sense of accomplishment. All your hard work has paid off but now there’s just one part left to do, finish the quilt. How you start a quilt is important but so is the method in which you use in order to finish your quilt. There are several ways to finish a quilt using different methods that all get the job done but also give the quilt a different look with each different method used.

1.) The Knot Method

The first technique is the simple easy tie-to-go method more often called the knot method. This method  has some criticism from professional quilters as a sloppy and quick method for finishing a quilt. However, this is a great method for people who are just starting out because it is a more simpler approach making it fun and easy to do for beginners by simply tying the quilt layers together by hand with yarn or embroidery floss. This is also a great method do to if you are making a quilt with a child, since it needs no additional needles or a sewing machine, which can be hazardous around young children. However, if you plan to hold on to the quilt for a long time, I would recommend not using this method because overtime the knots can come undone making the quilt less durable in the future.

2.) Machine Tie Method

The second technique is an alternative to the first, which is using the sewing machine to tie your quilt together instead of doing it by hand. This is a nice technique if you like the tying style but your hands are too tired and or sore to do the actual tying. This a faster approach than the method above and will hold the quilt together longer with the tight sturdy stitches made by the sewing machine.

3.) Hand Quilting with a Hoop

The third method, hand quilting with a hoop, is another great way to finish a quilt. The hoop helps directs you in the right motion of sewing the quilt together. What’s really great about using the hoop method is that it is portable, allowing you to quilt anywhere at anytime whenever you want. A hoop also makes it easier for you to relax while quilting by having it hold everything in place for you while you sew.

4.) Big Stitching Method

The fourth method is quilting with big stitches, which can make the quilting process go faster if you are in a hurry to get the quilt done. This method saves you time but also gives you that nice fine finished look  with smooth stitching. This method is also great if you want the stitches to be noticed or incorporate it into part of the quilt color scheme and or design.

So whats your favorite technique? What method do you use to finish your quilts? Share with us your method on our Quilter’s Thread Mobile App.

Live Well. Quilt Well.

Have Iron, Will Travel

May 7, 2015 By Quilter's Thread

When quilting on the go it can be difficult to bring along all the necessary tools. It can be even more difficult to pack up a hot iron to take it home. Our ironing pad and tote might be just the solution you need.

The keys to this project are the fabrics. The ironing pad/tote is lined with silver ironing board fabric, also called Therma-Flec Heat Resistant Cloth Silver Fabric. The fabric is the same that all typical ironing board covers are made from. It is woven with 100% cotton that has a unique aluminized coating that gives the ironing board a smooth and heat resistant surface. This fabric is also great for pot holders and oven mitts. If you need to clean the fabric use a damp cloth and gently rub it, then lay it out to dry.

The project is padded with Insul-Bright.  This fabric is critical to this project because it keeps the heat from penetrating  through the pad/carrier. Insul-Bright is a batting made by needle punching deep polyester fibers through a non-woven substrate and through a metallized reflective poly film. Insul-Bright retains its form even after washing,  while the deep fibers prevent conduction and the reflective metallized poly film prevents radiant energy. This way, the heat is reflected back to its source

What you’ll need:

Materials:

  • (2) copies of pattern (one for the master and one for cutting) Ironing Pad and Tote Pattern
  • (1) 18” x 24”piece of fabric for outside: 18” x 24”
  • (½) yard piece of contrast fabric for handles, ties and binding.  Cut contrast fabric  into:
    • (2) 1 ¼” x width of fabric for ties and loops
    • (2) 3” x 21” for handles
  • (2) 1 ¼” x 21” pieces of stabilizer, batting or interfacing
  • (1) 18”  x 24”  piece of Insul-Bright
  • (1) 18” X 24” piece of  Silver Ironing Board Fabric 18” X 24”
  • (1) 18” x 24”  piece of cotton or cotton/poly batting. (You can you use two pieces of batting, but your ironing pad will be a bit puffy.)

(Note: we actually cut each piece larger than 18” 18 x 24” and trimmed it down after seing. This way we didn’t have to worry about the pattern and layers being perfectly lined up.)

Tools:

  • Basic quilting tools.

Step # 1

Layer the fabric in according to this order:

  • Fabric (facing down)
  • Batting
  • Insul-Brite
  • Silver Ironing Board Fabric (facing up)

IMG_5985

Place your pattern fabric on top of the silver iron board fabric and pin through all layers. Use a walking foot to stitch on the pattern through all layers. Work from the center out as much as possible. Remember, the solid black lines are the stitching lines. The dotted lines on the pattern are there to help with measuring.

IMG_5982

 Step # 2

Square up your pad/tote by using a rotary cutter and ruler to trim the outside lines, (indicated in red on the pattern.) We found it easiest to trim the corners first.

IMG_5987

Step # 3

Tear off the pattern, being careful not to loosen your stitching.

IMG_5991

Step #4

Set aside your layered pad/tote while you made handles and ties. For the handles, position (1) piece of stabilizer ¼” from the edge of (1) 3” x 21” strip of contrast fabric. Fold the ¼” extra over the stabilizer and press.

IMG_5992

Press the remaining fabric tight to the stabilizer. Turn the strip and press the remaining raw edge under even with the edge of the handle.

IMG_5993

Stitch in place close to the edge of the handle. Repeat for the second handle.

IMG_5994

Step # 5

For the ties and loops, press (1) 1 ¼” strip of contrast fabric in half lengthwise. Open and fold one raw edge into the center fold and press. Fold the other raw edge into the center fold and press. Stitch closed near the open edge. Repeat on the other 1 ¼” strip.

From each strip, cut (2) 4” pieces off the end of each strip, then cut the remaining strips in half. You will have (4) small pieces for loops and (4) longer pieces for ties. Knot one end of each of the (4) longer ties. (Later, you will stitch the untied end of each tie to the pad/tote.)

Step # 6

Position straps 1″ or less from stitched line on long side of the pad as shown, and stitch down 1/4″ from the edge. Position loops as shown, about 1/2″ from the point on the long side of the pad as shown, and stitch down 1/4″ from the edge.

IMG_5996

Step # 7

From constrast fabric, cut binding strips your preferred width. Be careful not to catch handles or loops in your stitching. (We used Susie’s Magic Binding Method, which you can find in the app under Resources/Tips, References & Tools/Library.)

Step # 8

Before turning binding, stitch ties to the outside of the pad on the short sides at the points, as shown below. Turn binding and stitch down, being careful not to catch any of the handles, loops or ties in your stitching.

IMG_5997


And, there you have your ironing pad.

IMG_6001

For your iron tote, slip the ties through the loops, fold up and tie.

IMG_5999

Note: When laundering your pad/tote, wash on a delicate cycle with cold water with no chlorine beach and then tumble dry low.

Live Well. Quilt Well.


« Previous Page
Next Page »

Copyright Quilter's Thread© 2025