• Skip to primary navigation
  • Skip to main content
  • Skip to primary sidebar

Quilter's Thread

Quilting Inspiration and Education

  • Home
  • About Lisa
  • Gallery
  • Shop
    • Cart
    • QT Summits
    • Patterns
  • Events
    • Calendar
  • Contact

Personalized Baby Quilts

July 31, 2015 By Quilter's Thread

Got a family member or friend expecting a little baby girl or boy soon? What better gift to give them than a special baby quilt made by you. Making a special one-of-a-kind baby quilt for that special baby is so much more meaningful than purchasing one from the store. Here are some tips on how to make a baby quilt more personal and unique for the baby on the way.


Screen Shot 2015-07-29 at 6.30.21 PM

Mrs. Schmenkman Quilts


Tip # 1: Add the baby’s name 

If you already know what the baby’s name is going to be you can add it to the design of the quilt, making it even more personal. Having a baby’s name forever printed on the baby’s first blanket gives it a nostalgic feeling that will be carried on in the future.


From: Dukely.blogspot.com

From: Dukely.blogspot.com

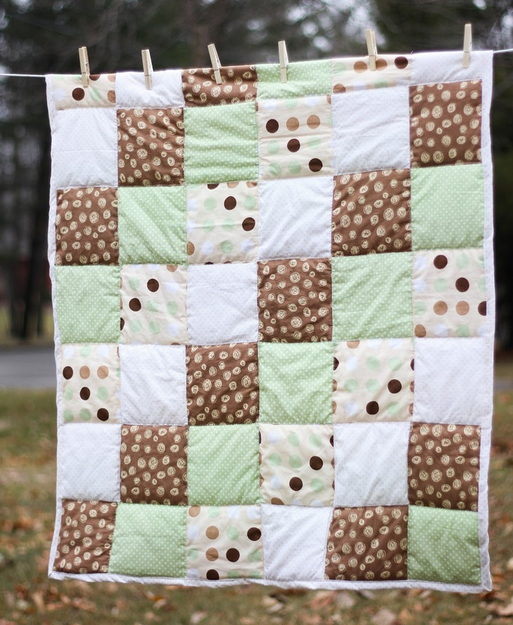
Tip #2: Gender Neutral Shades

Neutral shades are always a safe go-to when making a baby quilt for a friend or family member, especially if you don’t know the sex of the baby yet. For instance the colors yellow, light brown, orange, white, teal green and gray are perfect. Here are just a few examples of how other quilters have made a neutral themed baby quilt fit for any baby. Notice that the yellow quilt has initials on it in the corner adding more character to it.

Michael Miller Fabrics' Citron-Gray Nursery: Patchwork Baby Quilt with Monogram

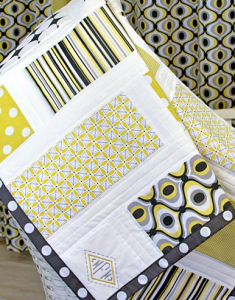
Michael Miller Fabrics’ Citron-Gray Nursery: Patchwork Baby Quilt with Monogram


By CoolSpool on Etsy

By CoolSpool on Etsy


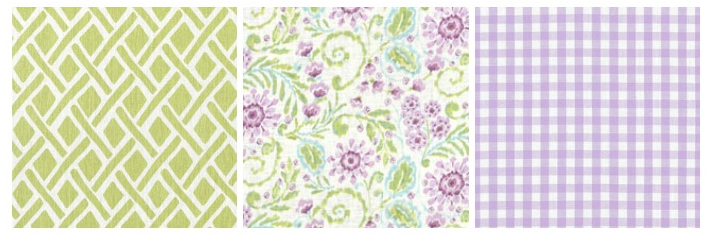
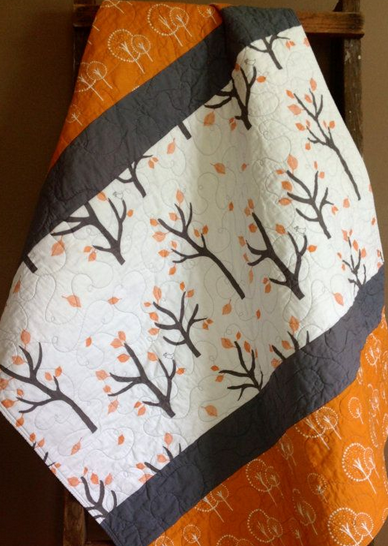
Tip # 3: Incorporate the season of the baby’s birthday

Another way to make a baby quilt more unique is to add in some themes of the season that the baby is born. For instance, if the baby is born in the spring try adding some floral designs to the pattern or even on the border of the quilt. There are also many different fabrics that will contain flowers, animals, trees or snowflakes which you can incorporated into the baby quilt as well.


Screen Shot 2015-07-30 at 8.40.09 PM

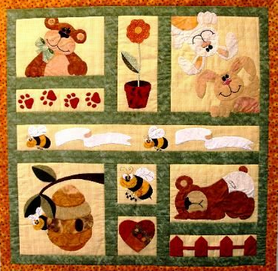
From desireesdesigns.com


From waynesquilts.blogspot.com

From waynesquilts.blogspot.com


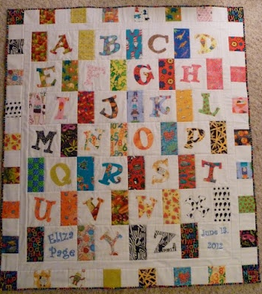
Tip # 4 : Interactive and playful

Why not make a baby quilt that the baby can also use to play with as he or she grows up. For example, making a baby quilt that has the alphabetical letters in it can help the child learn his or her letters. Or another playful quilt is one that appears as a road that the baby can use later to play with toy cars or trains.


Share with us on our mobile app your favorite baby quilts that you have made or are currently working on! What’s your favorite style or theme? By commenting and posting on Quilter’s Thread mobile app you can earn points to potentially receive a gift card for the shops posted on the app.

Live well. Quilt well.


The Joy of Free-Motion Quilting – Tips and Tricks

July 23, 2015 By Quilter's Thread

Free-motion quilting has been a constant discussion online in the quilting community and industry. What does free-motion quilting necessarily mean? Free-motion quilting is just like it sounds. Free-motion quilting is a technique used where stitches are added by swiftly sewing in any direction freely just on the surface of the quilt top. When free-motion quilting you are in control – not the machine, meaning you have to move the fabric under the needle in a certain motion creating a pattern.

When doing free-motion quilting you can make any type of design pattern such as simple circles to detailed leaves or echo quilting where you outline a focal point. Another way to free-motion quilt is to simply meander and let your hands simply guide wherever and watch your design come to life. This is a great way to add more design and technique to your quilt, however be aware that it takes a lot of time and dedication to build this skill. Here are some images below that show just how unique and different free-motion quilting can be.

Screen Shot 2015-07-23 at 1.53.44 PM 5basicspiral Screen-Shot-2013-06-04-at-9.55.18-AM

There are two essentials things that you need before starting

  1. Disengage the feed dogs in order to do free-motion quilting
  2. A free-motion foot specific to your machine

One important tip about free-motion quilting is that thread tension can easily occur, so if you are a beginner first practice without the sewing thread in the needle in you’re sewing machine. Once you get more comfortable then add thread and then still practice some more. It will take time and patience to get the tension just right. Use top stitch needles size 90/14 in order to give you good results. For more detailed information and pictures explaining thread tension check out Greta’s Quilting Studio.

Another important tip is about the batting and what kind to use when doing free-motion quilting. First off the thinner your batting is, the more issues you are going to have with tension while sewing. Instead choose a batting that is thicker allowing more room for your stitches to interlock creating less tension. A good batting for free-motion quilting is one that is 80% cotton and 20 % polyester, this allows a better quilting texture.

Lastly when re-positioning your hands when you get close to the needle make sure to stop with the needle down before moving your hands back so as not to hurt yourself. Also by doing this it is ensuring that the fabric doesn’t move or budge while you re-position your hands properly. Most importantly when it comes to free-motion quilting always practice, practice and practice in order to improve the quality of your stitching designs.

Make sure to share with us on Quilter’s Thread mobile app your favorite free-motion quilting designs and tricks!

Live Well. Quilt Well.

Key Tips and Tricks for Straight Line Quilting

July 16, 2015 By Quilter's Thread

Straight line quilting is when you sew straight lines across the top of the quilt in various directions depending on one’s preference and the pattern type. What’s great about straight line quilting is that it creates an overall clean and modern look for your quilt as shown in the image below. Although it sounds simple, straight-line quilting can be tricky and multiple complications can occur depending on your sewing machine settings and if your pattern is more complex. Even though it seems like straight line quilting is a simple technique here are some tips and tricks to help make it even easier for you to do.

8469041730_25f3fff329_z

From Canoe Ridge Creations

Tools & Needs

  • A sewing machine with:
    • Walking foot for your sewing machine (optional) will help things run more smoothly
    • An adjustable presser foot
    • Seam guide
  • Quilt material:
    • Quilt top and bottom fabric
    • Batting material (preferably cotton)
    • Thread
    • Pins
    • A new needle can make a big difference

 Tip #1

Always increase stitch length and decrease pressure of presser foot when doing straight line stitching for best results making the stitches even more durable. Preferably use pressure at 1.5, stitch tension at 3.5 and tension at 3 if possible. Make sure to do a practice run to see if you like those settings, if not simply adjust to your own preferences. Also depending on the fabric type you are using you might want to adjust the pressure either higher or lower.

Tip #2

Puckering can occur when straight line quilting, especially if you sew over other seams which can cause the fabric to clump up like little bubbles. To avoid puckering, try to hold the fabric in place as much as possible when sewing. Make sure that the fabric of the quilt is supported at the back and front in order to reduce the fabric from shifting around causing more puckering to occur. When moving the fabric be cautious and gentle while using the presser foot. Also make sure to slowly guide the fabric through the walking foot when quilting for best results.

Tip #3

If you are a perfectionist and want exact straight lines you can also use a seam guide to help make even more perfect straight lines when quilting. A seam guide often comes with a walking foot but if it does not you can simply purchase one at a quilting store or online. A seam guide gives you extra guidance in order to evenly space your lines when sewing. A seam guide comes with two blades, one for the right side of the walking foot and the other side for left. The blades can be attached at the rear of the walking foot.

Other Helpful Tips & Tricks

  • Always do a test run on an extra piece of scrap fabric to see if there needs to be any adjustments made before beginning.
  • Keep testing until you are completely satisfied with your straight line stitching.
  • Always change your sewing needle with a fresh new one before starting for best results.
  • Back stitch every beginning of a line to help lock in the stitch to make it sturdy and durable.
  • Work from the center to the outside of the quilt.

Make sure to share with us on our mobile app your favorite sewing tips and tricks that  you use when sewing your quilts. Post and share some of your favorite straight line quilts as well on Quilter’s Thread mobile app.

Live well. Quilt well.


How to Mix Patterns of Fabric Together

July 1, 2015 By Quilter's Thread

We’ve all done it, when we enter a quilt shop and just start grabbing every fabric pattern we see that we like. However, it can get overwhelming with how to go about mixing and matching these different patterns together. It can get pretty tricky to pick out the right kinds of patterns of fabric for your next project so here are a few tips to help you when mixing and matching different patterns of fabric.

First pick out patterns that speak to your personality

By doing this allows you to pick patterns of fabric that you know you will love no matter what. Also if it turns out that some of the fabric patterns don’t work into the mix, you can then save them for later for another project or use it for a border for another quilt.

The second step is to pick three patterns per space in your quilt

When picking your three patterns choose one of each type listed below.

  • 1. Floral and or organic themed
  • 2. Geometric
  • 3. A scale that is either bigger or smaller than the other two patterns chosen above.

The third step is to then consider the color for each pattern

Think about what colors you want to highlight in your quilt. For instance if you wanted to highlight one of your favorite colors like the color purple then pick out a pattern with that color in it. For instance have your floral pattern consist of some purple in it as well as your geometric pattern too. This will allow the patterns to mix and match together easily because they have the same color in them.

As seen in the patterns below here is an example from the website Tiny Sidekick.

Screen Shot 2015-06-30 at 5.00.54 PM


  • The first pattern to the right is called Green Lettuce
  • The second pattern in the middle is called Purple Floral
  • The third pattern to the left is called Purple Gingham.

Notice how when you move from left to right how each pattern has similar colors as the pattern in the middle but are different in the style of pattern. This is a great mixture of different patterns that work well together. Another way to help you pick colors of different patterns that are going to work well is by using a color wheel to see if they complement each other.

The final step is to play around with the patterns before starting

Another great tip when trying to pick patterns that will mix well together is to take a swatch of the fabric patterns you like from the fabric or quilt shop if they allow this. Then take them home and play around, swapping different patterns in and out of the mix to see which ones actually work well for  you. This will help you save time and money.

Check out the local shops on our Quilter’s Thread mobile app for where to get your fabrics for your next quilt project and share with us how you like to mix and match patterns when quilting.

Live well. Quilt well.


« Previous Page
Next Page »

Primary Sidebar

Welcome!

Lisa Berentsen
I’m Lisa Berentsen, 
a teacher and artist who uses abstract geometric quilts to create images depicting beauty, balance, joy and hope. Share the passion and dialog. Create!

Live well, Quilt Well.

Newsletter

We'd love to keep you up to date on the latest with Quilter's Thread and share a free pattern with you. Never miss a post or a pattern, and get the best quilting content in the world delivered to your inbox each month.

Search Quilter’s Thread

Recent Posts

  • Free Falling Upward: Gravity and the Aspen Trees
  • What was wrong with Supernova?
  • “Wandering With Abandon” will be wandering for 2 years
  • Quick Quilt for Project Quilting 10.3 Challenge.
  • New Quilt: Promising First Date

Copyright Quilter's Thread© 2025