• Skip to primary navigation
  • Skip to main content
  • Skip to primary sidebar

Quilter's Thread

Quilting Inspiration and Education

  • Home
  • About Lisa
  • Gallery
  • Shop
    • Cart
    • QT Summits
    • Patterns
  • Events
    • Calendar
  • Contact

Dare To Be Square Monthly Pattern Prize

February 19, 2016 By Quilter's Thread

Quilter’s Thread Mobile App has a new pattern prize for this February that you’ll want to get. This quilt is called Dare  To Be Square and it is a perfect pattern to make for this spring with its playful interlocking squares.

dare to be square8162cd4c-93b8-4b57-9e62-96ded39177d8

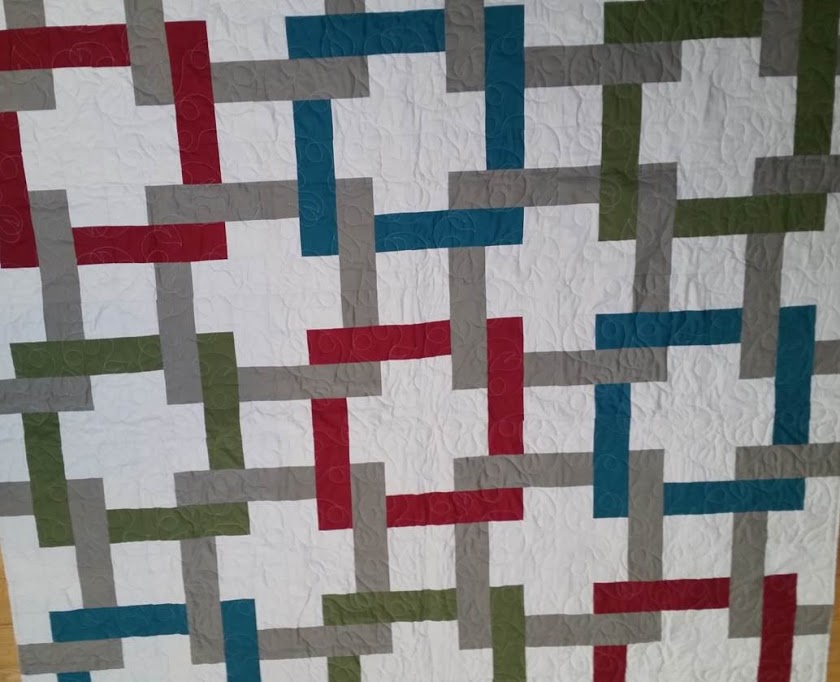
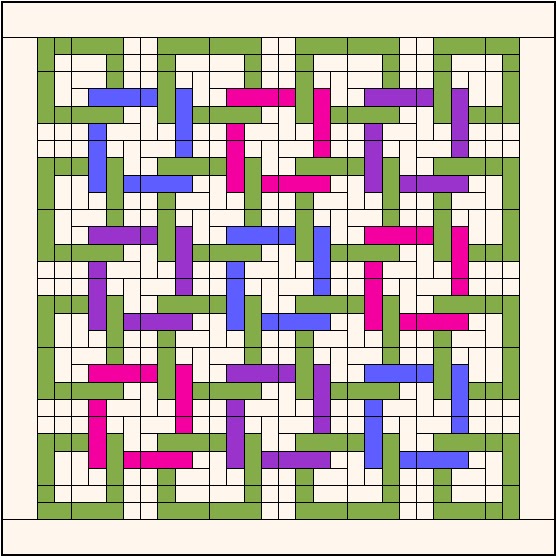
This pattern is a traditional structure that is a nice modern pattern used with traditional fabrics. It is an interesting pattern with the interlocking squares. If you look close at the outline below you will notice the pattern block is more of a dog bone shape. In the images below there is a border unlike in the image above. If you want the lines to come to an end add a border to make the square links complete instead of running off the quilt.

f393de56-2769-446c-a1b4-25d770799d97

Share with us any versions of the Dare to be Square quilt pattern that you make on Quilter’s Thread Mobile App. Remember to stay active on Quilter’s Thread Mobile App in order to earn points to win this free pattern at the end of this month. Comments, uploading photos and responding to surveys generate 1 point each. Liking 3 things generates 1 point. Earn 10 points gets you a free pattern and 40 points gets you a free pattern and a Quilter’s Thread cloth shopping bag. Earn 75 points gets you a free pattern, shopping bag and a $20 gift card.

Live Well. Quilt Well.

How To Use the Self-binding Method

February 12, 2016 By Quilter's Thread


The self-binding method also called invisible stitching is a simple and easy process of binding your quilt. You simply sew on the inside of the folds so the stitching is on the inside making it practically invisible. If you are making a quilt bigger than a queen size bed you should refrain from using the self-binding method because it tends to make the quilt look more wonky. Instead this method is great for smaller quilts. This method is always great for sewing together stuffed toys and cushions. Although the self-binding method is known as an easy process there are key points and tips to mention that will help you while using this method.

c1d911fa305bcedfa1329ed34abb7b8fdownload


Step # 1

Prepare your quilt top as usual. Then cut the backing making it wider than the top of the quilt and the batting on all four sides. Most recommend making it 3″ / 7.5 cm wider.

Step # 2 

Next pin or baste the quilt sandwich (quilt top, batting and backing) and use your spray basting to make sure all three layers are stuck together well.

Step # 3

Then start at the middle of one side and fold the excess backing fabric towards the edge of the quilt making the two edges meet. Then fold it again creating a nice firm edge that overlaps the quilt top. Fold along all four edges and pin everything down neatly.

Step #4

When you get to the corners you may need to trim off a bit of the quilt top and batting in the seam allowance to reduce bulk when bringing the backing to the front. Now here is the tricky part. Simultaneously fold the sides towards the corner and decide which side will be on top then tuck the lower one under. If there is extra fabric hanging outside of the corner simply cut it or tuck it in, which ever you prefer.

Step # 5

Then take the time to baste everything to help make the sewing of the binding much easier to complete and help give it a nice finished look. Next, sew the binding by inserting your needle under the binding making the thread hidden from view. While doing this grab the quilt top and punch the needle down and through the fold of the edge. Pull the thread now through and take a small stitch parallel with the folded edge. It is easier if you start sewing along one side of the quilt and not the corner.

Step #6

Continue making a similar stitch along the folded edge and remain stitching like this switching the stitches between the top and the edging. Next when you get to the corners push the needle through the inside of the layers of the corner fold so that it is exiting right in the corner. Then, make the same alternating stitching to sew down the edge of the corner.  A decorative stitch could also be used in this technique.

Once you are done working your way around the quilt edges, remove the basting stitches and admire your great work! Got any great tips or suggestions to this method? Share with us on Quilter’s Thread Mobile App.

Live Well. Quilt Well.

How to Square Up Your Blocks

January 29, 2016 By Quilter's Thread

Squaring Up a Quilt Block

As a beginner quilter squaring up your block is an important task that is easy to learn but can also be a frustrating part of the quilting process if not done right. Make sure you know how to square up your blocks in order to reduce measuring and cutting errors. Whether you are squaring up small or large square blocks this method is crucial to know.  Here are some tips and tricks on how to square up your blocks.

Screen Shot 2016-01-29 at 12.57.58 PMScreen Shot 2016-01-29 at 1.03.28 PM

What tools you’ll need: A cutting mat, rotary cutter, painters tape and appropriate sized square ruler.

  • Tip #1 Use painters tape
    • With your square ruler tape the corner and the edges of  what you want your block size to be on the plastic ruler. By taping off the size it will allow you to line the block up easily without having to focus extra on your lines while cutting. The painter’s tape is also easy to remove and won’t ruin your ruler or leave any marks.


  • Tip # 2 Find the right square ruler
    • Make sure you pick out a good quality ruler with lots of lines for measuring. Ask a friend or do some research before you go buy a ruler to see what one is best for your preferences. Make sure you have the right ruler size for your block. For instance, if the block is small such as 6 1/2″ use a 6 1/2″ square ruler. Any blocks from 7 1/2″ to 12 1/2″ can be used with a regular ruler if you want to save some extra money. If you are making bigger blocks make sure you invest in larger rulers.


  • Tip # 3 Turn Your Block Diagonal
    • This is an important and helpful technique when you begin to measure your block up. Before lining up turn your block diagonal then place the square ruler over it and line it up. The benefit of doing it this way is that you get to cut two sides of the block at once with easy access. Once cutting those two sides of the block flip and cut the other two sides by lining it up while using the painter’s tape again to help guide you.


Share with us on Quilter’s Thread Mobile App your tips and tricks for how you cut your blocks of fabric. Remember the more active you are on the app, the more points you can earn each month for prizes. Stay tuned for this January pattern prize Snails on the Beach. If you have earned enough points this month you will receive the Snails on the Beach pattern at the end of this month.

Live Well. Quilt Well.

Tricks to Keep Your Workstation Organized – Continued

January 16, 2016 By Quilter's Thread


1. Wall Of Shelves Or Dressers

Having a wall of shelves in your work area room is a great way to store your fabrics and tools and have them in clear view. Or you can use a dresser to store items if you prefer not having them in clear view. Dressers are a great option if you quilt in an area of your home that is also used for gatherings such as the living or dining room.

a10bc51b8e687ebac55e9e855ae7be009050e90c8da0a1d45a0aadeba2690473


2. File Your Fabrics 

Another great way to organize fabrics is to file them away in your desk drawer. This is how you can also organize your fabrics and have them near where you are working without having to get up to reach them. You can also organize them by color to make it even easier to find specific fabrics while working.

12d109088f8c120add6533eb78acc2d4


3. Multi-Use Storage Trays for Little Things

Trays are a great way to organize small quilting items such as pins and clips. You can store them in your desk drawer or on a shelf whichever is easiest for you to access when quilting.

ba06a8dc0dd8885e8d2191e90fcb3f9d

4. Easy Access Tool Board

This is a great way to have your sharp cutting tools safely stored while also in clear view and easy to grab. The metal magnetic board allows for the metal tools to cling to the board without falling ensuring that you won’t lose them. Make sure that if you use this board that it is stored in a safe place away from children.

organize,craftroom,stroage,craft,studio,workshop-39902ddfb731b990f7a0c5e97fc5a4a3_h

5. Command Hooks 

Use command hooks to organize all of your rotary quilt rulers and hang them up in view while having it close to your work area. By having things in view instead of stored away will help you find them easier and be able to quickly get your projects completed.

4d6f8623112609a210c6d53514959f3a

Share with us on Quilter’s Thread Mobile App your favorite organizing tricks. The more you comment and like on the mobile app the more points you can earn to win prizes every month.

Live Well. Quilt Well.

« Previous Page
Next Page »

Primary Sidebar

Welcome!

Lisa Berentsen
I’m Lisa Berentsen, 
a teacher and artist who uses abstract geometric quilts to create images depicting beauty, balance, joy and hope. Share the passion and dialog. Create!

Live well, Quilt Well.

Newsletter

We'd love to keep you up to date on the latest with Quilter's Thread and share a free pattern with you. Never miss a post or a pattern, and get the best quilting content in the world delivered to your inbox each month.

Search Quilter’s Thread

Recent Posts

  • Free Falling Upward: Gravity and the Aspen Trees
  • What was wrong with Supernova?
  • “Wandering With Abandon” will be wandering for 2 years
  • Quick Quilt for Project Quilting 10.3 Challenge.
  • New Quilt: Promising First Date

Copyright Quilter's Thread© 2025